Overview
In recent years, professional cartoonist software has risen up all over the place but they're rarely free. In order to achieve the basic cartoon effect, you don't need a great rendering software or even years of experience. Yes, that's true!
All you need is essential - a bilateral filter and some edge detection. The bilateral filter will decrease the color palette, required for the cartoon look, and edge detection will enable the production of bold shapes.
- Implement the bilateral filter to decrease the color palette of the image.
- Transform the original color image to grayscale.
- Apply median blue to decrease image noise in the resultant grayscale image.
- Create an edge mask from the grayscale image applying adaptive thresholding.
- Integrate the color image from step 1 with the edge mask from step 4.
Step 1
In this section, we are setting the parameters, reading the image, and resizing it.
import cv2
import numpy as np

num_down = 2
num_bilateral = 7

img_rgb = cv2.imread("kid.jpg")
print(img_rgb.shape)

img_rgb = cv2.resize(img_rgb, (500, 500))
Step 2
In this section, we are downsampling the image and then applying a bilateral filter, a specific amount of times
img_color = img_rgb
for _ in range(num_down):
    img_color = cv2.pyrDown(img_color)

for _ in range(num_bilateral):
    img_color = cv2.bilateralFilter(img_color,
                                    d=9,
                                    sigmaColor = 9,
                                    sigmaSpace = 7)
Step 3
In this section, we are upsampling, transforming the image to grayscale, apply the median blur, and the thresholding.
for _ in range(num_down):
    img_color = cv2.pyrUp(img_color)

img_gray = cv2.cvtColor(img_rgb,
                        cv2.COLOR_RGB2GRAY)
img_blur = cv2.medianBlur(img_gray, 7)

img_edge = cv2.adaptiveThreshold(img_blur,
                                255,
                                cv2.ADAPTIVE_THRESH_MEAN_C,
                                cv2.THRESH_BINARY,
                                blockSize = 9,
                                C = 2)
Step 4
In this section, we perform 'bitwise AND' and then display the resultant image. Do make sure to add in the end: cv2.waitKey(0).
img_edge = cv2.cvtColor(img_edge, cv2.COLOR_GRAY2RGB)
img_cartoon = cv2.bitwise_and(img_color, img_edge)
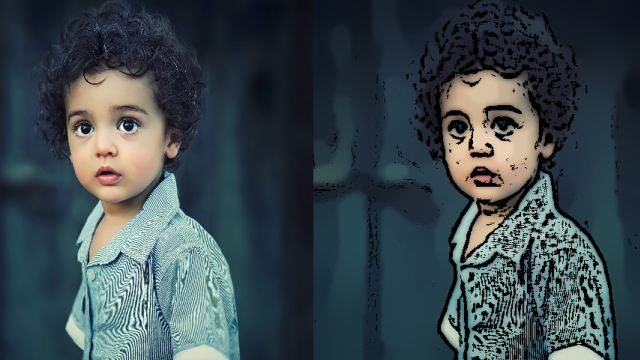
stack = np.hstack([img_rgb, img_cartoon])
cv2.imshow("Stack Images", stack)
cv2.waitKey(0)The code
import cv2
import numpy as np

num_down = 2
num_bilateral = 7

img_rgb = cv2.imread("kid.jpg")
print(img_rgb.shape)

img_rgb = cv2.resize(img_rgb, (500, 500))

img_color = img_rgb
for _ in range(num_down):
    img_color = cv2.pyrDown(img_color)

for _ in range(num_bilateral):
    img_color = cv2.bilateralFilter(img_color,
                                    d=9,
                                    sigmaColor = 9,
                                    sigmaSpace = 7)

for _ in range(num_down):
    img_color = cv2.pyrUp(img_color)

img_gray = cv2.cvtColor(img_rgb,
                        cv2.COLOR_RGB2GRAY)
img_blur = cv2.medianBlur(img_gray, 7)

img_edge = cv2.adaptiveThreshold(img_blur,
                                255,
                                cv2.ADAPTIVE_THRESH_MEAN_C,
                                cv2.THRESH_BINARY,
                                blockSize = 9,
                                C = 2)

img_edge = cv2.cvtColor(img_edge, cv2.COLOR_GRAY2RGB)
img_cartoon = cv2.bitwise_and(img_color, img_edge)

stack = np.hstack([img_rgb, img_cartoon])
cv2.imshow("Stack Images", stack)
cv2.waitKey(0)
The Output